
I admire, now more than before, people with the discipline to write about what they do as they do it instead of catching up later. That’s what has happened with Bathroom Darkroom, but it won’t get in the way of keeping up up to date on how things were put together.
The first film has been developed and the first prints made! Here are a few views of the maturing darkroom and a scan of the first wet print. Please don’t think it blasphemy that I illustrate a blog about film photography with both analog and digital images. Digital is still very expedient; I had forgotten how much goes into getting a decent wet print. The darkroom views, and the construction photos that will follow, were taken digitally way before facilities were available to develop and print. I don’t have a film scanner so the B&W images you see will be scans of prints. I hope that makes up a little for my non-purist position that there’s plenty or room for both media.
This is the Bathroom Darkroom at a glance.
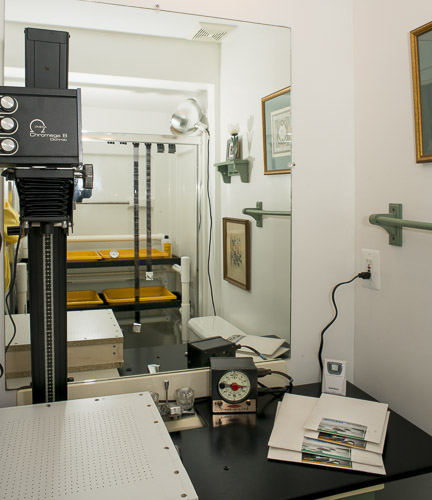
Good thing the mirror is there or it would have taken two glances. This is a real 4 1/2′ x 7 1/2′ bathroom, folks – not the darkroom you’d design on paper. Dry side is a platform over the sink; wet side is on the rack in the shower stall in the background. Upcoming topics include repairing the enlarger, building the wet rack, fabricating the vacuum easel, buying darkroom stuff online, yet another DIY print washer and my experience with safelights. Oh – and some ramblings about different film and cameras with a hopefully memorable image or two.
Here is our first image, shot with a Nikon F2 on HP5, developed in XTOL 1:3, printed on Adorama Variable Grade RC somewhere in the neighborhood of grade 3 and developed in BW-65.
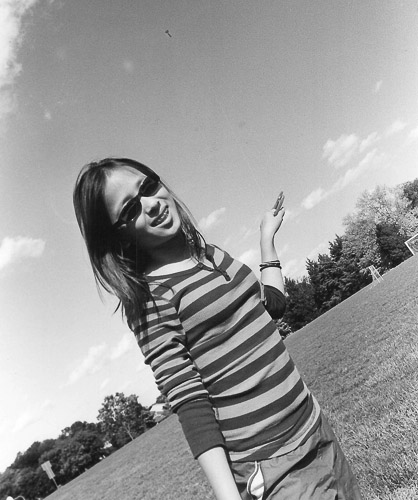
The black speck in the sky is Ally’s kite. The big spot half way up the kite string is from the negative, though I haven’t investigated it for root cause of a water spot or something more sinister. The borders are from the blog software; I printed this not on the DIY borderless vacuum easel in the foreground, but by placing the 5×7 paper right on the enlarger baseboard, lined up with a framing square. How’s that for low tech? I’ll fire up the vacuum easel any day to see if it prints as well as it tested in the garage. The print looks, on my calibrated display, as close to the paper 5×7 (cropped a little here) as I could get it.
I might be able to talk Ally into shooting and printing some, but she prefers being in front of the camera, while Addison enjoys the technical side of photography. There might be something here for them both!
Tweaks are still going on, but now we’re going to spend more time shooting and printing than building. This is exam week at school and then Addison will have time for a little film instruction. I have some Polypan F shot in the F2 and Instamatics 100 and 500 ready to develop – maybe in Caffenol.
Stay tuned.
